 |

 IBM-AUSTRIA - PC-HW-Support 30 Aug 1999
 |
1130 System Board / PCMCIA Slot Assembly (2625 365X, XD)
1130 System Board / PCMCIA Slot Assembly
 Be Careful
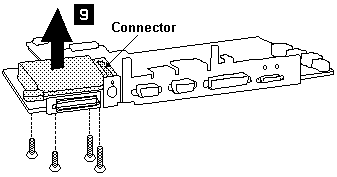
- Connect the CPU card using the procedures exactly as shown in the
figures. Make sure that the two CPU card connectors are connected
properly. If these connectors are not connected, you cannot power on
the computer.
- Do not apply any extra force to the shaded area of
the CPU card when connecting.
NOTE:
- The system unit serial number must be restored when
the system board is replaced.
To restore the system unit serial number, select the
option 'Set system
identification' on the maintenance diskette.
The EEPROM on the system board contains the vital
product data (VPD), that is, the system unit serial number,
system board system number, and other computer-unique data.
- Do not power off the computer when restoring the VPD.
The system unit serial number label is attached to the base cover.
- Before removing and replacing the system board, make sure that the
PCMCIA cards are removed and the eject levers are not sticking out.
- Do not pull the PCMCIA slot assembly while removing the system board.
- When handling the PCMCIA slot assembly,
be careful not to disassemble any part of it.
The slot assembly is not solidly fixed when it is removed from the
system board or the FRU.
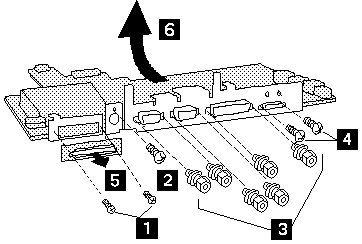
| Step |
Screw Location (Quantity) |
Length |
| 1 |
System Board (2) |
M2.5 x 3 mm |
| 2 |
System Board (1) |
M2.5 x 4 mm |
| 3 |
System Board (6) |
Hex Stud |
| 4 |
System Board (2) |
M2 x 4 mm |
| 7 |
PCMCIA Slot (2) |
M2 x 4 mm and M2 nut |
| 8 |
PCMCIA Slot (2) |
M2 x 14 mm |
NOTE: Make sure you use the correct screws when replacing.
Back to 
More INFORMATION / HELP is available at the IBM-HelpCenter
Please see the LEGAL - Trademark notice.
Feel free - send a  for any BUG on this page found - Thank you.