Back to Contents Page
Your computer includes a standard (34-watt/hour [WH]) or high-capacity (46-WH) lithium ion battery that provides power when an electrical outlet is not available. The battery is installed on the underside of the computer and forms part of the bottom of the computer. Lithium ion batteries are longer lived than conventional batteries and do not require replacement as often. Lithium ion batteries do not have the memory effect that is exhibited by nickel-metal hydride (NiMH) and nickel-cadmium (NiCD) batteries. You do not need to drain a lithium ion battery completely before recharging it. A lithium ion battery will not forget at which point it is fully charged. NiMH and NiCD batteries may not charge fully if they are partially drained then recharged.
Do not place spent batteries with common household waste products. Contact local authorities for the location of a chemical waste collection program nearest you.
Keep the following information in mind when you are running your computer from the battery:
| NOTE: The battery is designed to work with Dell Latitude CS/CSx portable computers only. Do not use the battery with other computers, and do not use batteries from other computers with the Dell Latitude CS/CSx. |
The battery is partially charged when you receive it. Dell recommends that you charge your battery to full capacity before using it to power the computer.
If you are powering the computer from a battery, try to conserve battery power. A number of factors affect battery operating time:
When you activate suspend mode (known as standby in the Microsoft® Windows® 98 operating system), the computer can remain in suspend mode on battery power for approximately one week (if the battery was fully charged before activating suspend or standby mode).
If you are going to store the computer, disconnect all devices and turn off the computer. Remove the battery when you store your computer for an extended period of time. A battery will drain when not in use during prolonged storage. After a long storage period, recharge the battery fully before you attempt to run your computer from battery power.
Each time you connect the computer to an electrical outlet or install a battery in a computer that is connected to an electrical outlet, the computer checks the battery's charge. The AC adapter charges the battery (if needed) and then maintains the battery's charge.
| NOTE: For maximum battery performance, charge the battery only at normal room temperature. |
When installed in a computer connected to an electrical outlet, the battery immediately starts charging. The green power indicator remains steady while the AC adapter charges the battery. The indicator starts blinking when the express charge cycle is complete. While the indicator is blinking, the AC adapter provides a trickle charge to bring the battery to full capacity. The indicator continues to blink until you remove the battery or disconnect the computer from its electrical outlet.
NOTICE: If the battery status indicator flashes alternately green and amber while the computer is connected to an electrical outlet, disconnect the computer from the outlet and allow the computer and the battery to return to room temperature. Then reconnect the computer to its electrical outlet and continue charging the battery. If the computer is not allowed to return to room temperature, the battery stops charging before it reaches full capacity.
If the computer is turned off and connected to an electrical outlet through the AC adapter, it takes the AC adapter about 1 hour and 20 minutes to fully charge a battery that has been completely discharged. If the computer determines that the battery is near full capacity, the AC adapter skips the express-charging process and starts trickle-charging the battery. If the computer is on, it takes up to 2.5 hours to charge a fully discharged battery, depending on which devices you are using and which programs you are running.
| NOTE: You can leave the battery in the computer as long as you like. The battery's integrated circuitry prevents the battery from overcharging. |
Before you attempt to charge a battery that is hot (either from recent use or from being in a hot environment), note the following information:
NOTICE: To avoid data loss, do not remove the battery while the computer is turned on unless the computer is connected to an electrical outlet .
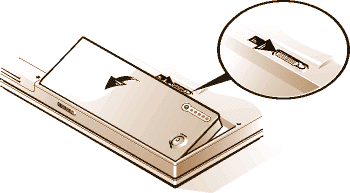
To replace a battery in the battery bay, perform the following steps (see Figure 1).
| NOTES: If necessary, print these instructions for
reference before proceeding. You cannot replace the battery while the computer is running on battery power. To replace the battery while the computer is running, you must connect the computer to an electrical outlet or enter suspend (or standby) mode or suspend-to-disk (S2D) mode. |
- Connect the computer to an electrical outlet.
- Place the computer in suspend (or standby) mode by pressing <Fn><Esc> (or <Scroll Lock><Esc> on an external keyboard if the External Hot Key option is enabled in the System Setup program).
- Place the computer in S2D mode by pressing <Fn><a> (or <Fn><q> on a French keyboard). When the green power indicator turns off, continue to step 3.
NOTICE: If you choose to replace the battery with the computer in suspend (or standby) mode, you have up to 4 minutes to complete the battery replacement.
Figure 1. Removing a Battery

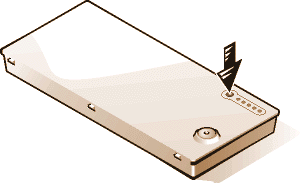
The battery charge gauge, located on the battery and accessible on the underside of the computer, consists of five indicators and a test button. Each indicator represents 20 percent of full charge. If only one indicator lights up, recharge the battery before using it.
To check the charge level, press the battery test button (see Figure 2). The appropriate number of indicators lights up for a few seconds to indicate the amount of charge remaining in the battery. For example, if three indicators light up, your battery has between 40 percent and 60 percent of its charge left.
Figure 2. Battery Charge Gauge

| NOTES: An indicator that blinks rapidly indicates a
temporary failure or a potentially recoverable failure like overheating. Allow the battery
to cool for several minutes before checking the charge level again. If the battery has permanently failed or completely discharged, no charge gauge indicators will light when you press the battery test button. If you install a failed or completely discharged battery in the computer and the battery status indicator flashes amber rapidly, the battery has failed. If the battery status indicator turns solid green, allow the battery to charge overnight and check it the next day. If the battery is fully discharged, it takes a much longer time than usual to recharge it. To purchase a new battery, call Dell or access the Dell World Wide Web site at http://www.dell.com. Dispose of the old battery properly. |
The battery charge gauge uses its five indicator lights to show the percent of charge remaining in the battery:
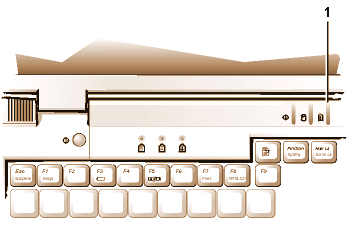
The first low-battery warning—a blinking amber battery status indicator—occurs when you have about 15 minutes of battery life left under current conditions and the computer is not connected to an electrical outlet.
Figure 3. Battery Status Indicator
 |
|
NOTICE: When you see a low-battery warning, save your work immediately. Then replace the battery or connect your computer to an electrical outlet.
Normally, if no input/output (I/O) activity occurs within 75 seconds after the first low-battery warning, the computer enters S2D mode. If the computer has no S2D partition, the computer enters suspend (or standby) mode, where it can preserve data for several hours.
Alternatively, you may have set the computer to enter S2D mode after a certain amount of time with no I/O activity. In this case the computer enters S2D mode before flashing the final low-battery warning.
Once S2D mode is activated, no further power is consumed.
NOTICE: Never turn off the computer while the drive access indicator is on. Doing so could cause data loss. Instead, close all of your application programs before you turn off the computer.
The second low-battery warning—a steady amber battery status indicator—occurs when you have about 5 minutes of battery life left under current conditions and the computer is not connected to an electrical outlet.
After the second low-battery warning, if no further I/O activity occurs within 15 seconds, the computer enters S2D mode. If the computer has no S2D partition, it enters suspend mode, in which it can preserve data for several hours.
If the computer is already in suspend mode when a final low-battery warning occurs, the computer enters S2D mode immediately. If S2D mode has been disabled, the computer reenters suspend mode.
NOTICE: To avoid losing data (and possibly corrupting data areas on your hard-disk drive), save your work immediately after a second low-battery warning. Then connect your computer to an electrical outlet, or place the computer in suspend mode. If the battery runs completely out of power, the computer shuts off without properly closing any open files.
A battery problem may prevent the battery from being charged to its full potential and can lead to unpredictable operation. To obtain a new battery, call Dell or access the Dell World Wide Web site at http://www.dell.com.
Dell suggests you follow these precautions when using the battery:
NOTE: If the battery has 0 (zero) percent charge, you cannot use the battery test button to check the battery's capacity. The battery gauge indicators will not light if the battery is completely drained.
When your battery no longer holds a charge, call your local waste disposal agency or environmental agency for advice on disposing the computer’s lithium ion battery.
| CAUTION: Do not puncture or incinerate the battery. |
| NOTE: This computer is supplied with a lithium ion battery. Lithium ion batteries are longer lived than conventional batteries and do not require replacement as often. Do not place spent batteries in common household waste products. Contact local authorities for the location of a chemical waste collection program nearest you. To purchase a new battery, call Dell or access the Dell World Wide Web site at http://www.dell.com. |
You automatically conserve battery power each time you connect the computer to an electrical outlet. The battery is even being recharged when you use AC power. The battery's life expectancy is largely determined by the number of charges it receives, so use an electrical outlet to run the computer whenever possible.
You can customize power management by individually controlling the computer's power conservation features. These features reduce power consumption by monitoring application programs and computer devices for inactivity and slowing down or stopping some of the computer’s internal devices.
| NOTES: When you use power conservation features,
you often trade some of the performance of the computer for increased battery operating
time. For example, if you turn off the hard-disk drive, you may experience a delay the
next time the computer tries to access the hard-disk drive. Other power conservation features, such as suspend (or standby) mode, stop almost all system activity. They allow you to maximize power conservation when your work is interrupted. |
Experiment with power conservation features to achieve the optimum power conservation for your work environment.
To turn on the computer, press the
power button.| NOTE: If your computer's operating system is "locked up"—that is, it does not respond to commands—press and hold down the power button for at least five seconds to turn off the computer. |