 |

 IBM-AUSTRIA - PC-HW-Support 30 Aug 1999
 |
Celeron™ Processor Module
Celeron™ - Processor Module
Removing the Celeron™ CPU
Follow these steps to remove the Celeron™ CPU module from the slot.
NOTE: Determine the type of processor you are installing and make sure the
jumpers are set correctly. Run the Setup Utility after correctly installing a processor.
 -ATTENTION- Processors are sensitive to static discharge.
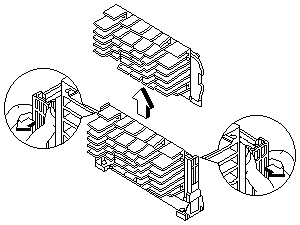
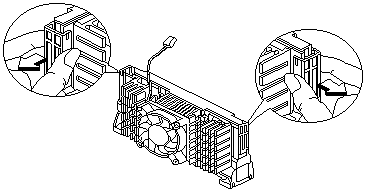
- While slightly pulling either side of the universal retention mechanism, pull out the CPU.
For Celeron™ CPU with HeakSink
For Celeron™ CPU with FanSink
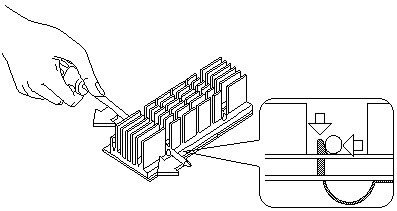
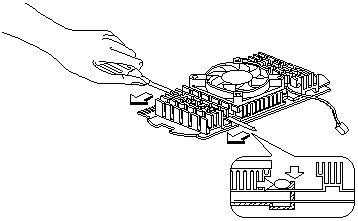
- Use a screw driver to push the four fastener tabs outward to unlock the heat sink from the processor,
then carefully detach the heat sink from the processor.
For Celeron™ CPU with HeakSink
For Celeron™ CPU with Fan Sink
Installing the Universal Retention Mechanism (URM)
Follow these steps to install the universal retention mechanism:
- Pull out the sides.
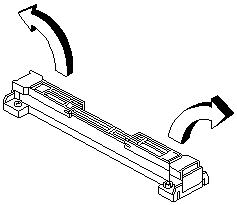
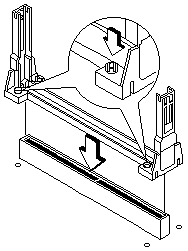
- Place the universal retention mechanism over the CPU connector on the system board
and press it until it clicks into place.
- Press down the four plastic rivets to secure the URM.
Make sure all four rivets are properly inserted into the holes on the system board.
Installing a Celeron™ CPU
NOTE: Observe the ESD precautions when installing or removing a system component.
The system board supports a Celeron™ processor that comes in the SEPP (Single-Edge Processor Package)
type packaging.
The SEPP is similar to SECC and is compatible with Slot 1 connectors.
NOTE: Before you proceed, make sure that there is no processor installed in the CPU connector.
Follow these steps to install a Celeron™ processor:
- Install the universal retention mechanism.
- Remove the Celeron™ processor from its protective packaging.
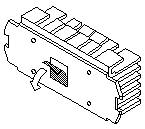
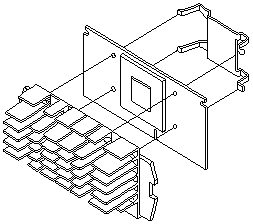
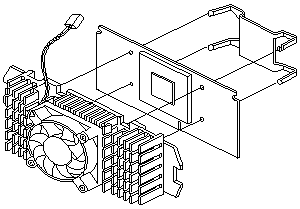
- Position the heatsink fastener underneath the processor card.
- Remove the thermal tape protector at the back of the heatsink.
For Celeron™ CPU with HeatSink
For Celeron™ CPU with FanSink
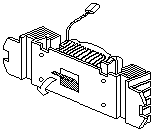
- Align the four tabs of the fastener with the four holes on the Celeron™ processor.
- Press the heatsink, processor card and fastener together to lock the heatsink.
For Celeron™ CPU with HeatSink
For Celeron™ CPU with FanSink
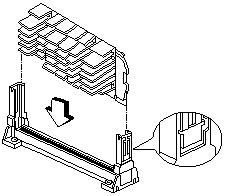
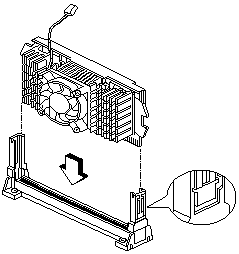
- With the processor card golden fingers pointing downward, align the processor to the posts of the URM.
- Lower the processor into to the CPU connector on the system board until the golden fingers
touch the connector.
- Press down the processor until the golden fingers completely fit into the connector and the
latches on the sides lock the processor into place.
Check the sides of the URM. The latches should be properly inserted into the appropriate slots
on the retention mechanism.
 -IMPORTANT- If you find the processor card difficult to
insert into the slot, do not force it. The orientation of the heatsink may be incorrect.
For Celeron™ CPU with HeatSink
For Celeron™ CPU with FanSink
 -CAUTION The heatsink becomes very hot when the system is on.
NEVER touch the heatsink with any metal or with your hands.
- Processor with the capabilities of MMX (TM) technology
- Processor in Single Edge Contact (S.E.C.) cartridge packaging technology (slot 1).
- Dual Independent Bus architecture separates dedicated external system bus and dedicated
internal high-speed cache bus.
Back to 
More INFORMATION / HELP is available at the IBM-HelpCenter
Please see the LEGAL - Trademark notice.
Feel free - send a  for any BUG on this page found - Thank you.
 -ATTENTION- Processors are sensitive to static discharge.


 -IMPORTANT- If you find the processor card difficult to
insert into the slot, do not force it. The orientation of the heatsink may be incorrect.


 -CAUTION The heatsink becomes very hot when the system is on.
 for any BUG on this page found - Thank you.