 |

 IBM-AUSTRIA - PC-HW-Support 30 Aug 1999
 |
Setup Utility
Setup Utility
The Setup Utility lets view and change important information about the
computer and its hardware.
Using the Setup Utility
You might need to use the Setup Utility in the following situations:
- If you add or replace a hardware option (such as a diskette drive, hard disk drive,
or memory module), and you want to verify or make a change.
- To verify a change after removing a hardware option.
- If you get an error code and message.
You can also use the Setup Utility to:
- Check the computer's hardware features. For example, you can use this program to check
the amount of memory or the size of the hard disk in the computer.
- Change the computer's serial and parallel port settings, and the parallel port mode.
- Set up or change a password on the computer.
- Change the date and time on the computer.
- Reduce the amount of energy the computer uses by setting up the computer's Power Management features.
- Determine which Plug and Play adapter cards you want configured by system BIOS.
Starting the Setup Utility
The Setup Utility displays screens that let you view information about how the computer is set up (called
the configuration), or change certain information on the computer. There are two ways to display the Setup Utility screen:
- Whenyou power on the computer, press F1 when the IBM APTIVA logo appears.
- If you have an error, the computer shows a popup window with an error code and description. Press Enter to get
the Setup Utility screen.
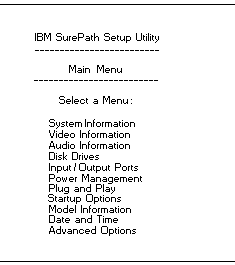
The Setup Utility screen display the type of information shown here. The actual screen on the computer might look
slightly different., but they operate the same way.
Here are the keys you use to move through and make changes to the Setup Utility screens.
|
| Keys |
Function |
|
  |
Use these keys to highlight an option. |
| | |
| < > |
Use these arrow keys to make a selection and change an option. |
| | |
| F1 |
Help. Press this key if you want more information about an option or using the screen. |
| | |
| F2 |
General Help. Press this key if you want general information about the computer features. |
| | |
| Page Down |
Press this key to see the next page (screen). |
| | |
| Page Up |
Press this key to go to the previous page (screen). |
- Brackets [ ] show you which options can be changed on the screen.
- The * symbol on the screen shows you that an option has been changed.
Now that you know how to work with the Setup Utility screens, read on to learn about
the options you can change on the screen.
Making Changes with the Setup Utility
You can change only some of the information that appears on the Setup Utility Screen. The
information you can change is always enclosed in brackets like this: [Disabled]. The
entries on the screen that you cannot change provide useful information about the computer and its
hardware. For example, if the mouse is not working or installed incorrectly, the entry will show if it is
disabled or not installed.
Here are the options available on the Setup Utility screens:
System Information: This screen provides a summary of the computer features.
(This is an information only screen and cannot be changed.)
Video Information: This screen provides information about the installed video controller.
For more information on monitors, monitor frequencies, and refresh rates, see 'Type A-1 System Board' or
'Type A-2 System Board'.
Disk Drives: This screen provides information about the installed diskette drives, hard disk drives, and CD/DVD-ROM installed in the computer.
Hard Disk Drive 1 on this screen is the hard disk that came with the computer.
If you add or change a drive, you must select the correct drive type on this screen. If you are adding a hard disk or CD/DVD-ROM to the computer,
see 'System Board Layout - Type A-1' and
'System Board Layout - Type A-2'.
If both a CD/DVD-ROM drive and a hard disk drive are installed, the jumpers on the hard disk drive must be set to
master for the hard drive to appear as Drive 3 on the Setup Utility screen. The CD-DVD-ROM must be set as the slave device. It will appear as Drive 4 on the screen.
If a hard disk is the only drive attached to the secondary hard disk drive connector, it appears as Drive 3 on the Setup Utility screen. If two hard disks are attachedto this connector,
they appear as Drives 3 and 4 on the screen.
Input/Output Ports: This screen allows you to change the serial and parallel port addresses. Mouse and keyboard information is also provided on this screen.
The computer has one serial port and one parallel port. Each port has a special address (identifying location) assigned to it. If you add any additional serial or parallel port adapters, make sure that each port
has a different address.
- The serial port A default address is 2F8 (hex) using IRQ3
- The parallel port default address is 3BC (hex)
Other serial and parallel port addresses are available. However, if you change an address
on this screen, you might also need to make changes to the software. For instructions on changing the software, see the user's guide
or online information supplied with software.
The Parallel Port Mode allows you to change the mode of the parallel port. The standard mode for the parallel port is Compatible mode. You
can increase the efficiency of the parallel port by using Enhanced modes with supporting hardware.
NOTE: The Enhanced modes use recent technology and are only supported by newer hardware (such as a printer).
If you change the mode of the parallel mode of the parallel port, you might need to make changes to the supported hardware and its software.
Power Management: This screen provides information about the Power Management features. Power Management puts the computer in a low power
state when the suspend function is invoked in the operating system.
See 'Using Power Management Utilities' for more information.
Power Management can:
- Put the computer in a Suspend mode to conserve energy when you have not used the mouse, keyboard, or hard disk for an amount of time you select.
- Automatically Resume the computer when the phone rings so that the computer can receive a fax or take a message.
- Automatically power-on and power-off the computer when using Home Director.
The following are the Power Management options you can change:
- Suspend Timer
- Check Keyboard and Mouse Activity
- Check Disk Drive 1 and 2 Activity
- Check Disk Drive 3 and 4 Activity
- Check Diskette Drive Activity
- Check Serial Port Activity
- Check Parallel Port Activity
- Check Modem Activity
- APM Connection
Plug and Play: This screen provides information about the Plug and Play features. The
screen includes the Auto Configure Cards option, and alist of all Plug and Play adapter cards installed in the computer.
Auto Configure is an option that allows you the choice of:
- All Plug and Play adapter cards configured by the system BIOS
- Only Plug and Play adapter cards required to boot the system configured by system BIOS
If you have a Plug and Play operating system, the computer might function better if only the Plug and Play adapter
vcards required to boot the system are configured by system BIOS. If you choose to have only the adapter cards required to boot
the system configured by system BIOS, use the opearting system's Plug and Play utilities to configure the other Plug and Play cards.
Plug and Play Adapter Cards is the option that lists all the Plug and Play cards you have installed in the system unit.
NOTE: Only the newest operating systems support Plug and Play adapter cards. See the documentation supplied with the
operating system to determine if it supports Plug and Play adapter cards.
Startup Options: This screen provides information about the computer power-on (startup) sequence. When you power the computer on, it
looks for the operating system files. Use the Startup Sequence option to tell the computer where to look for these files. The computer can search for these files
on a diskette, an adapter card, a network, or a hard disk.
The system's startup sequence automatically looks for the operating system files on the hard disk if the files are not found on diskette.
Model Information: This screen provides model number, serial number, BIOS version level number, and BIOS manufacturing date.
Date and Time: This screen allows you to change the date and time on the computer. The changes take effect immediately. Type the date in the format shown on the screen.
Type the time in 24-hour format. For example:
| 12 midnight is |
00:00 |
| 12 noon is |
12:00 |
| 1 p.m. is |
13:00 |
Advanced Options: This screen provides the following features that the computer supports.
- Security options (power on password, diskette drive, keyboard)
Power On Password is the option that allows you to create a power on password to restrict the use
of the computer. Each time the computer is powered on, you must enter this password before you can use the computer. A
password can be up to seven characters long (letters, numbers, or both). Once you create the password, be sure to write it down
and put it in a secure place.
Diskette Drive Access allows you to to enable or disable the diskette drive access.
Operate without Keyboard allows you to enable or disable the keyboard.
Operate without Diskette Drive(s) allows you to enable or disable the diskette drive.
- Cache options (cache size, cache state)
This option shows the amount of internal cache memory in the computer's processor. You cannot add internal cache memory to the computer.
Cache memory is special buffer storage that holds frequently used instructions and data, and works faster than main storage. With cache memory installed,
the application and programs run faster. You can disable cache memory to slow down the computer.
- ROM shadowing
This feature provides memory boundary information.
- Memory options
This feature provides standard and EDO feature information.
- PCI card options
This feature allows you to enable or disable card bus mastering.
Back to 
More INFORMATION / HELP is available at the IBM-HelpCenter
Please see the LEGAL - Trademark notice.
Feel free - send a  for any BUG on this page found - Thank you.