see >> SCSI 68-Pin Internal and External Connector
see >> SCSI Interface - Electrical Specifications
FRU P/N 06H5250 Adaptec AHA-2940 SCSI-2 PCI Adapter
OPT P/N VSCPCI1
FRU P/N 06H6431 Adaptec AHA-2940W SCSI-2 F/W PCI Adapter
FRU P/N 07H0132 Adaptec AHA-2940S SCSI-2 Fast PCI Busmaster Adapter
FRU P/N 12J3094 Adaptec AHA-2940UW SCSI - PCI F/W Ultra Adapter
OPT P/N 76H5407 Adaptec AHA-2940UW SCSI - PCI F/W Ultra Adapter (76H3579)
Use only single-ended SCSI devices with the AHA-2940/2940W. Use only differential
SCSI devices with the AHA-2944W. Devices may be damaged if used with the wrong SCSI specification.
Read the SCSI device documentation if you are not sure whether the device is single-ended or differential.
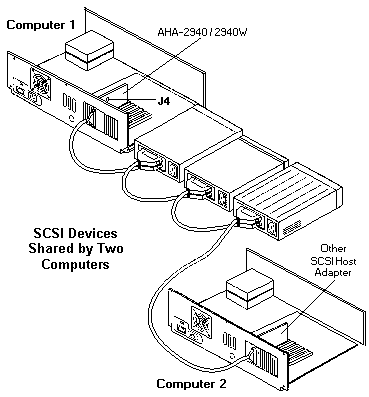
Only two of the three connectors on the AHA-2940W/2944W host adapter can be used at the same time.
Resistor Network (RN) setup for AHA-2944W Adapter
| Low | High | Install | Remove |
|---|---|---|---|
| Off | Off | None | All RNs |
| On | On | RN1, RN2, RN9, RN10, RN11 and RN12 with 10-pin 330-ohm RNs RN3, RN4, RN5, RN6, RN7 and RN8 with 10-pin 150-ohm isolated RNs |
None |
| Off | On | RN9 and RN12 with 330-ohm bussed RNs RN3 and RN6 with 150-ohm isolated RNs |
RN1, RN2, RN4 RN5, RN7, RN8 RN10 and RN11 |
RN1 RN2 RN9 RN10 RN11 and RN12 are 330-ohm resistor networks
RN3 RN4 RN5 RN6 RN7 and RN8 are 150-ohm resistor networks
A 330-ohm resistor will have a 330 or 331 included in the part number printed on the resistor and a 150-ohm resistor
will have 150 or 151.
Jumper Table
| AHA-2940 | AHA-2940W | AHA-2944W | Description |
|---|---|---|---|
| J1 | J3 | J1 | 50-Pin 8-Bit Internal SCSI Connector |
| J2 | J1 | J2 | External LED Connector |
| J3 | 50-Pin 8-Bit External SCSI Connector | ||
| J2 | J3 | 68-Pin 16-Bit Wide Internal SCSI Connector | |
| J4 | J4 | J4 | Termination Jumper for Multiple Computer Configurations |
| J6 | J6 | 68-Pin 16-Bit Wide External SCSI Connector | |
| U4 | U5 | U21 | AIC-7870 PCI-SCSI Bus Master Chip |
| U5 | U6 | U23 | Host Adapter BIOS ROM |
ADAPTEC EZ-SCSI 3.03L
The following information is available in this section:
1. Upgrade Information
2. New Features
3. CD-ROM Drive Support
4. Scanner Support
5. Floptical Support
6. SETUP Command Line Options
7. ASPIBUF.SYS
8. SMARTDRV 5.0 and XA formatted CDs
9. ASPI8DOS.SYS Information
10. Troubleshooting/Limitations
1. Upgrade Information
If you are using a custom version of Adaptec EZ-SCSI which may not include the
following components: SCSI Tape Backup utility, Photo CD Viewer, Microsoft
CD-ROM extensions (MSCDEX).
To upgrade to the standard version of Adaptec EZ-SCSI for $29, call Adaptec
at one of the following numbers:
Adaptec Phone Numbers
Technical Support (800) 959-7274
M-Th: 6:00am to 5:00pm, F: 6:00am to 3:00pm
Pacific Standard Time
Bulletin Board Service (BBS) (408) 945-7727
24 hours a day (up to 14400 baud, using
8 bits, 1 stop bit, no parity)
Literature Hotline (800) 934-2766
M-F: 5:00am to 6:00PM Pacific Standard Time
Software Ordering (U.S.A. and Canada) (800) 442-7274
M-F: 5:00am to 6:00pm Pacific Standard Time
International Software Ordering (818) 365-6264
M-F: 5:00am to 6:00pm Pacific Standard Time
Interactive Fax Service (408) 957-7150
24 hours a day
2. New Features
Adaptec EZ-SCSI 3.03L features numerous enhancements including:
o Easy to use Windows installation utility
o Additional CD-ROM support (including LUN/jukebox support)
o HP scanner support
o 1024 bytes / sector support added to ASPIDISK.SYS and AFDISK.EXE
o Windows based SCSI tutorial
o Windows on-line catalog of 3rd party companies
o Windows on-line description of EZ-SCSI files
o Music database feature added to our Windows CD Play utilities
o Floptical support added to ASPIDISK.SYS
o Volume serial ID support added to ASPIDISK.SYS for removable media
o AHA-1520/1522/1520A/1522A configuration utility (Windows)
o Wide SCSI support added to ASPIDISK.SYS and AFDISK.EXE (for users of
the AHA-2740W/2742W and the AHA-2940W/2944W)
o Removable media lock/unlock/eject utility, RMVTOOL.EXE (DOS command
line utility)
o VASPID.386 has been rewritten to allow TimerCriticalSection=xxxx to be
specified in your SYSTEM.INI
o ASPIBUF.SYS added (see below)
o * PCI host adapter support
o ** AHA-1530P/1532P "Plug and Play" support
* New to Adaptec EZ-SCSI 3.01
** New to Adaptec EZ-SCSI 3.02
The following Adaptec SCSI Host Adapters are fully supported:
ISA Bus
o Adaptec AVA-1505
o Adaptec AVA-1515
o Adaptec AHA-1510/1520/1522
o Adaptec AHA-1510A/1520A/1522A
o Adaptec AHA-1530P/1532P
o Adaptec AIC-6260 or AIC-6360 based SCSI host adapters
o Adaptec AHA-1540B/1542B
o Adaptec AHA-1540C/1542C
o Adaptec AHA-1540CF/1542CF
Microchannel Bus
o Adaptec AHA-1640
EISA Bus
o Adaptec AHA-1740/1742/1744
o Adaptec AHA-1740A/1742A
o Adaptec AHA-2740/2742/2740T/2742T
o Adaptec AHA-2740A/2742A/2740AT/2742AT
o Adaptec AHA-2740W/2742W
o Adaptec AIC-7770 based SCSI host adapters
VL Bus
o Adaptec AVA-2820/2822/2825
o Adaptec AHA-2840VL/2842VL
PCI Bus
o Adaptec AHA-2940
o Adaptec AHA-2940W
o Adaptec AHA-2944W
o Adaptec AIC-7870 based SCSI host adapters
3. CD-ROM Drive Support
The following drives have been tested by Adaptec with Adaptec
EZ-SCSI 3.03. All drives support both audio and data. Photo CD is
supported where indicated:
Firm-
Name Model ware SCSI Photo CD
---- ----- ----- ---- --------
Compaq CDU561-31 1.8I 2 multi session
CDU6611-31 1.8B 2 multi session
Chinon * CDS 431 H48 1 single session
CDS 435 M62 1 single session
CDS 535 Q08 2 multi session
Denon * DRD 253 V 1 single session
Hitachi CDR 1750S 12 1 single session
CDR 3750 4 1 single session
CDR 6750 0005 2 multi session
CDR 1950S 0005 2 multi session
IBM Internal CD-ROM 2443 2 multi session
Enhanced CD-ROM II 0893 2 multi session
LMS (Philips) * CM 214 .12 1 single session
CM 215 .13 2 multi session
NEC CDR 38 1 2 multi session
** CDR 55JD 1 1 multi session
* CDR 72 E 1 single session
CDR 73 1.2 1 single session
* CDR 74 1 1 single session
CDR 74 1.0a 1 single session
CDR 74-1 1 2 multi session
* CDR 84 1 1 single session
CDR 84 1.0a 1 single session
CDR 84-1 1 2 multi session
** CDR 210 1.0 1 multi session
CDR 210P 1.0 1 multi session
MultiSpin 3X 1.0 2 multi session
CDR 500 1.0 2 multi session
CDR 510 1.0 2 multi session
MultiSpin 4X 2.5A 2 multi session
CDR 900 2.5A 2 multi session
Panasonic/ 501 family 1.0B/C 1 single session
Matsushita CR 503 1.0A 2 multi session
CR 532 2.0A 2 multi session
CR 532 2.5A 2 single session
CR 533 1.1a 2 multi session
LK-MC501S 1 1 single session
Philips CDD-BK01 / IMS CCD-463 0.00 2 multi session
Pioneer *** DRM 600 806 1 single session
*** DRM 604X 2403 2 multi session
Plextor/Texel Shinaken 3021 1.04 1 single session
Shinaken 5021 1.04 1 single session
DM 5021 1.04 1 single session
DM 3024 1.10 2 multi session
DM 5024 1.10 2 multi session
DM 3028 3.00 2 multi session
DM 5028 3.00 2 multi session
Sanyo CRD 400E 1.31 2 multi session
CRD 400I 1.31 2 multi session
Sony CDU 541-01 2.6A 1 single session
CDU 561 1.8K 2 multi session
CDU 561-31 1.8i 2 multi session
CDU 6211-10 2.6A 1 single session
TEAC CD 50 1 2 multi session
Toshiba XM 3101BME 3232 1 no
TXM 3201A1 3332 1 single session
XM 3301B 272 2 single session
XM 3401B 283 2 multi session
TM 3301E 2162 2 multi session
TX 3401B 2 2 multi session
XM 4101B 2893 2 multi session
* These drives do not directly support Photo CD. However, by adding
/XAEMUL to the ASPICD.SYS command line, in your CONFIG.SYS, we will
emulate support for single session Photo CD on these drives.
** These drives do not support parity. Please consult the troubleshooting
section of the users manual for information on using these drives.
*** These jukebox CD-ROM drives are fully supported. A drive letter will
be assigned for each CD.
4. Scanner Support
Hewlett-Packard's driver for HP ScanJet II scanners is included with Adaptec
EZ-SCSI. This driver is named SJIIX.SYS and is designed to function with
Adaptec's ASPI managers.
Installation of the driver is easy. Simply run Adaptec EZ-SCSI. Adaptec
EZ-SCSI automatically detects your HP scanner and installs SJIIX.SYS into
the appropriate section of your CONFIG.SYS file. You can then install
HP's DESKSCAN software if it is not already installed.
SJIIX.SYS supports the following applications using TWAIN or the
application's scanning utility:
Aldus: PhotoStyler
Arkenstone: Arkenstone Reader II
Caere: FaxMaster, OmniPage Direct, OmniPage Professional, PageKeeper
Calera: TrueScan, WordScan, WordScan Plus
Corel: Corel Draw
Delrina: WinFax, WinFax Pro
Eclipse systems: Eclipse fax
ExperVision: TypeReader
Image-In: Image-In
Intel® : Satisfaction
Light Source: Ofoto
Micrografx: Picture Publisher
Pixel Translations: Open Book
RIX Software: WinRix
Westbrook: File Magic
WordStar/ZSoft: Publisher's Paintbrush, PhotoFinish
5. Floptical Support
ASPIDISK.SYS has been modified to support Insite and IOMega floptical
drives. For those of you already familiar with ASPIDISK.SYS and AFDISK.EXE,
using floptical drives is a bit different. Do NOT use AFDISK.EXE to
format media inserted in your floptical drive. You can use SCSIFMT.EXE
to low-level format the media if necessary. To do a DOS format of your
media, simply insert the media into the floptical drive and run the DOS
FORMAT utility (run EZ-SCSI first).
6. SETUP Command Line Options
There are a couple of command line options that are available with the
Windows version of EZ-SCSI (SETUP.EXE):
Option: noctl3d
Example: c:\setup noctl3d
Description: EZ-SCSI for Windows uses a Dynamic Link Library (DLL) called
CTL3D.DLL that gives its dialog boxes the 3-D gray-box look.
This command line options disables the loading of this DLL.
Note that EZ-SCSI defaults to not loading this DLL if you are
using Central Point's Desktop (e.g. PC Tools for Windows 1.0).
Option: noscan
Example: c:\setup noscan
Description: By default, EZ-SCSI will automatically scan your hardware for
SCSI host adapters and SCSI devices. In the unlikely event
that this fails, we've provided an override switch that
instructs EZ-SCSI to NOT scan for hardware. It will simply
decompress the files on to your hard disk. You would then
need to manually edit your CONFIG.SYS and/or AUTOEXEC.BAT.
7. ASPIBUF.SYS
The ISA bus is limited to 24 bits of address. 2^24 = 16 MBytes. What does
this mean? It means that an ISA card that uses DMA cannot physically
access memory beyond 16 MBytes of RAM. This is a limitation of the ISA
bus.
The 16 MByte issue is not a limitation with PCI cards, EISA cards, VL cards,
or PIO cards. It is only an issue with an ISA card that uses DMA such as
the AHA-1540/1542. ASPIBUF.SYS is an ASPI double-buffering driver that
you load immediately after ASPI4DOS.SYS (e.g. before ASPICD.SYS, ASPIDISK.SYS,
etc.). It, along with ASPI4DOS.SYS, must both be loaded low before EMM386
(or QEMM, 386MAX, etc.). It intercepts ASPI and INT 13h commands and double-
buffers both so that these data transfers occur within the first 16 MBytes
of RAM. ASPIBUF.SYS is intelligent enough to not double-buffer if the
ASPI or INT 13h buffer is already within the first 16 MBytes of RAM. It is
only designed to work with ASPIDISK.SYS, ASPICD.SYS, and INT 13h commands.
Other ASPI drivers and/or applications may or may not work. ASPI FOR
WINDOWS APPLICATIONS (E.G. SHOWSCSI.EXE) will BE DISABLED ONCE THIS DRIVER
IS LOADED.
By default, ASPIBUF.SYS will allocate a 16K buffer for double-buffering. You
can specify the size (2K-64K) by using the size= command line switch. For
example:
device=c:\scsi\aspi4dos.sys /d
device=c:\scsi\aspibuf.sys /size=8
device=c:\scsi\aspidisk.sys /d
8. SMARTDRV 5.0 and XA formatted CDs
SMARTDRV 5.0 (in MS-DOS 6.2, Windows for Workgroups 3.11) now includes
caching for CD-ROM drives. There is a problem with SMARTDRV in its support
for XA formatted Compact Discs. If you experience "Not Ready" errors,
using SMARTDRV 5.0, add /E:2048 to your SMARTDRV command line. For example:
C:\DOS\SMARTDRV /X /E:2048
9. ASPI8DOS.SYS Information
The driver ASPI8DOS.SYS was added after the user's manual went to print.
For information on the available command line switches, refer to the
ASPI7DOS.SYS section in the user's manual. ASPI8DOS.SYS uses the same
switches that ASPI7DOS.SYS does. ASPI8DOS.SYS supports the following PCI
SCSI host adapters:
Adaptec AHA-2940
Adaptec AHA-2940W
Adaptec AIC-7870 based SCSI host adapters
10. Troubleshooting/Limitations
o If you have an Adaptec PCI SCSI host adapter installed in the system,
and EZ-SCSI for DOS does not detect the host adapter, try running
EZ-SCSI with the /pci command line switch. For example:
a: <Enter>
ezscsi /pci <Enter>
Note that if the system has EMM386.EXE loaded, from MS-DOS versions up
to 6.2, the system might hang when using the /pci switch. This has been
fixed in MS-DOS 6.21 and later. If you experience this problem, you
should not load EMM386.EXE when running EZ-SCSI for DOS. The same applies
to SCSIFMT.EXE. EZ-SCSI for Windows does not exhibit this problem and
should find the Adaptec PCI SCSI Host Adapter regardless of the PCI
system and whether or not you have EMM386.EXE loaded.
ASPI8DOS.SYS can be loaded high. However, due to the EMM386.EXE problem
mentioned above, some PCI systems will hang if loading ASPI8DOS.SYS after
EMM386.EXE. If you experience this problem, you will either need to load
ASPI8DOS.SYS before EMM386.EXE, or upgrade to MS-DOS 6.21 or later. Other
ASPI modules (e.g. ASPICD.SYS) can continue to be loaded high.
o EZ-SCSI for Windows (SETUP.EXE) will not load it's 3-D look DLL (CTL3D.DLL)
if you are using Central Point PC Tools for Windows Desktop. The
installation will still proceed without any loss of functionality.
o You should install Adaptec EZ-SCSI to a drive letter that exists at boot
time. This would NOT include RAM drives, network drives, removable
drives, etc.
o In the unlikely event that you encounter a timeout failure when EZ-SCSI
for Windows scans the SCSI bus, you should run EZ-SCSI for DOS first.
Let it modify your CONFIG.SYS to load the appropriate ASPI managers;
Reboot your system. You should then be able to run EZ-SCSI for Windows.
o If you have an AHA-2740W/2742W or an AHA-2940W (Wide SCSI Host
Adapter), the SCSI Interrogator for Windows (SHOWSCSI.EXE) will only
show icons for SCSI IDs 0-7. You will not see IDs 8-15.
Adaptec 7800 Family Manager V1.02 for OS/2 2.X
(Supports AHA-2940 and AIC-78xx)
Installation instructions for the AIC-7870 OS/2 2.x driver:
Installing the driver on a system containing OS/2 2.x
1) Open the OS/2 System Folder, then open the System Setup folder.
2) Double-click on Device Driver Install.
3) Insert the Manager Set floppy in the appropriate drive.
4) Change to the directory where the driver is located, usually OS2\2_X.
5) When you find the driver (AIC7870.ADD), select INSTALL.
6) After the install finishes, a message will appear to report the
status. An error will be displayed if no host adapters are found.
NOTE:
If you are using OS/2 2.0 GA, the above method will not work.
To install under 2.0 GA, open a full-screen OS/2 session. Change to
the drive and directory on the floppy where the drivers are located.
Type DDINSTAL and press ENTER.
You may also install the driver manually. Copy AIC7870.ADD to C:\OS2.
Add a line to your CONFIG.SYS that says BASEDEV=AIC7870.ADD .
Intel® Errata #8511 lists known data integrity issues with the
processor cache on the Saturn-1 chipset (82424TX). For this reason
Adaptec recommends that processor cache be disabled via the CMOS
setup to avoid data corruption. For more information, see Intel®
Errata #8511. You may get this from Intel® FaxBack system at
800.628.2283 or 916.356.3105. For more detailed information see
Errata #8512 and 8513.
Installing OS/2 2.1 and higher from floppy diskette
1) Make backup copies of the Installation Diskette and Disk #1.
2) Using the backup copies of the Installation Diskette and Disk #1
do the following:
a) Copy OS2LDR from the 7800 Manager Set onto the Installation Diskette.
b) Copy IBMINT13.I13 from the 7800 Manager Set onto Disk #1.
3) Install OS/2 using the backup diskettes and the remainder
of the standard OS/2 diskettes.
4) When installation has completed, Reboot the system.
5) After the system has Rebooted, follow the instructions for installing
the driver on a system containing OS/2.
***** IMPORTANT *****
There is currently no support for installing OS/2 2.0 on a hard disk
attached to an AIC-7870, due to limitations in the installation procedure.
Upgrading to OS/2 2.1 or higher is recommended.
Installing OS/2 2.x from CD-ROM
1) Make a backup copy of Disk #1.
2) Copy the file AIC7870.ADD to the backup copy of Disk #1.
3) Using a text editor, add the following line to the CONFIG.SYS found
on Disk #1 :
BASEDEV=AIC7870.ADD
4) When installation has completed, Reboot the system.
General Installation Notes
OS/2 2.x currently does not identify PCI systems and handles them
in the same way it would an ISA system. This can cause several different
problems: trouble installing OS/2 2.x and an inability to share a single
interrupt between multiple PCI adapters.
IBM is aware of these problems and has open APARs (PJ14230 and PJ14710)
tracking them. They will be fixed in a future release of OS/2; please check
the list of closed APARs accompanying each future release.
Currently, we have files which can be used as interim fixes for both these
problems:
OS2LDR - A new PCI aware version of the loader. This file can be used during
installation or installed after the installation of OS/2 has completed.
IBMINT13.I13 - A new PCI aware version of the generic INT 13H driver that
is used during installation from floppy disk.
If you update Disk #1 of the CD-ROM installation to include OS2LDR, please be
aware that this file will be overwritten from the CD-ROM. It may have to be
updated again on the boot drive when the installation has completed.
Configuration:
Generic command line switches for Adaptec drivers and OS/2 2.X
OS/2 adapter device drivers (.ADD files) are normally installed
automatically and require no further information from the user. However,
in certain situations the user may wish to modify the behavior of the
driver to meet their specific needs.
***** IMPORTANT *****
Please proceed cautiously with the following information. If you have
purchased software which requires you to use switches, it should include
instructions on how to use them. Most software requires no switches and
you do not need to concern yourself with the information about switch
settings.
The standard format for command line switches is :
BASEDEV=AIC7870.ADD [Universal Parameter][Adapter ID][Unit Parameter]
{[SCSI Target ID]}
[Universal Parameter] - An option that applies to all adapters
controlled by the driver.
[Adapter ID] - /A:n, where n is the number (zero relative) of the adapter
installed in the system. The adapter ID is determined when
the driver is loaded based on the order that adapters are
found in the system. (See below, AIC7870.ADD Specific Command
Line Switches.)
[Unit Parameter] - Modifies the behavior of the selected host adapter.
[SCSI Target ID] - The targets to which the Unit Parameter will be applied.
This parameter may be a single ID (d) or list of IDs (d,d,d).
Universal Parameters
/ET - Allow embedded targets. This parameter indicates that the ADD
should assume that all targets have more than one logical unit (LUN)
defined.
/!ET - Do not allow embedded targets (DEFAULT). This parameter indicates
that the ADD should assume that all targets have only one logical
unit (LUN) defined.
/V - Load driver verbosely. This parameter will display the driver
name as well as the version number and Adaptec copyright if the driver
loads successfully. Information on all targets found in the system
will also be displayed.
General Unit Parameters
/I - Ignore the specified adapter. This allows another driver to
share the adapters that the ADD would normally use.
/DM - Enable DASD manager support (DEFAULT). This parameter allows
OS2DASD.DMD to control the specified target(s) if they are
identified as DASD (hard disk) devices.
/!DM - Disable DASD manager support. This parameter prevents
OS2DASD.DMD from controlling the specified target(s).
/SM - Enable SCSI manager support (DEFAULT). This parameter allows
OS2SCSI.DMD to control the specified target(s) if they are
identified as NON-DASD SCSI devices. All SCSI hard disk
will be controlled by OS2DASD.DMD.
/!SM - Disable SCSI manager support. This parameter prevents
OS2SCSI.DMD from controlling the specified target(s).
Configuration Examples
Example 1
Suppose that you had a removable hard disk as target 3 and you wanted
to control the hard disk with an ASPI application and driver.
Normally OS2DASD will allocate this device, treat it as a large
floppy and prevent you from sending any SCSI commands via ASPI.
BASEDEV=AIC7870.ADD /A:0 /!DM:3 will prevent OS2DASD.DMD from
accessing the target and still allow OS2SCSI.DMD and OS2ASPI.DMD to
share access to it.
Example 2
Suppose that you had a multi-disk CD-ROM as target 4 on host adapter 0 and
two DASD devices as targets 1 and 5 on host adapter 1.
BASEDEV=AIC7870.ADD /ET /A:0 /!SM:4 /A:1 /!DM:1,5 will prevent
OS2SCSI.DMD from accessing the CD-ROM and prevent OS2DASD.DMD from
controlling the DASD devices. The driver will also search for multiple
LUNs on all host adapters.
Important Tips
1) There are no switches for controlling OS2ASPI.DMD directly. IBM did
not define them in their specification and we cannot be sure that other
host adapters will have the same switches.
2) OS2SCSI.DMD will only allocate devices when a device driver
requests it, but this will prevent OS2ASPI from accessing it. There is
nothing in the ASPI specification regarding device allocation so
OS2ASPI must rely on other managers to fairly share targets. This
should only be a problem if you have two drivers that use different
managers and you want them both to access the same target at the same
time.
3) Do NOT disable DASD manager access to target 0 if you are booting
from your SCSI host adapter. This will prevent the system from booting!
AIC7870.ADD-specific command line switches
This driver supports the AIC-7870 installed on an AHA-2940 PCI host
adapter. Adapter numbers are first assigned to boards with their BIOS
enabled; the numbers are assigned from lowest BIOS address to highest
address. Any remaining boards are assigned numbers by scanning slots.
Each slot is a combination of a bus number and a device number pair
starting from lowest to highest numbers, and the adapters are assigned a
number in the order they are found.
Special Unit Parameters:
/TAG: - Sets the number (1-16) of tagged commands for all target
devices on the host adapter. A value of one disables
tagged queuing. 16 is the maximum number allowed and 8 is
the default value.
/TAG:1 Disables tagged queuing for all target devices on a given
host adapter. The driver maintains a maximum of 2 non -
tagged commands per target internally. The driver treats
all target devices as non tagged devices, and sends only
one command at a time per target to the host adapter.
Example:
BASEDEV=AIC7870.ADD /A:0 /TAG:8
will set the number of tagged commands for all target
devices on the first host adapter to 8.
Limitations:
Due to an OS problem, OS/2 cannot currently support more than one
AHA-2940 (AIC7870) host adapter board. IBM is working to
fix this. Contact IBM for the status of this problem (APAR PJ14230).
Fault Tolerance is now supported in the driver. However, ABORT and
SCSI BUS RESET will only work for targets that are properly
behaved.
Adaptec 7800 Family Manager Set v1.02 - Windows NT
Driver v1.01 release for Windows NT v3.1
Directory Structure:
The files on this diskette which are required for the installation of
the 7800 series Windows NT driver are as follows:
\DISK1 - Disk tag file
\TXTSETUP.OEM - Install script used during NT installation
\WINNT\AIC78XX.SYS - Adaptec 7800 series driver v1.01 for Windows NT
\WINNT\README.TXT - This file
\WINNT\OEMSETUP.INF - Install script used by Windows NT Setup
Installation instructions for the AIC-7870 WIN/NT driver:
Read this to find out about
Adding, swapping, and removing Adaptec 7800 Family host adapters
in computers running Microsoft Windows NT
Installing Windows NT with an Adaptec 7800 Family host adapter(s)
Using software parameters to change the configuration of Microsoft
Windows NT drivers
Installation and Product Overview
The Adaptec 7800 Family driver, aic78xx.sys, allows the Windows NT
operating system to recognize the Adaptec AHA-2940/2940W, single-chip
AIC-7870, and single-chip AIC-7850 host adapters. These host adapters
are referred to collectively as the Adaptec 7800 Family host adapters.
At the time of this writing, the Windows NT drivers are supplied by
Adaptec only. In the future, however, Windows NT will supply Adaptec
drivers to function with the Adaptec 7800 Family of host adapters.
Adaptec always ships the latest Windows NT driver in the 7800 Family
Manager Set. This driver enables the Adaptec 7800 Family host adapters
to perform at an even higher level under Windows NT. The procedures in
this readme explain how to install Windows NT with the latest Adaptec
driver.
Requirements
A PCI computer, with an installed and configured Adaptec AHA-
2940/2940W host adapter(s); or a PCI computer with an embedded AIC-
7850 or AIC-7870 single-chip host adapter.
An installed primary (boot) floppy diskette drive. A 3.5-inch
(1.44 MByte) or 5.25-inch (1.2 MByte) high-density floppy
diskette drive is required.
An installed and configured CD-ROM drive (optional) for installing
from the compact disc. See your computer and peripheral documentation
for details.
The Windows NT distribution software and documentation.
The Adaptec 7800 Family Manager Set Diskette for NetWare, OS/2,
and Windows NT.
The Adaptec AHA-2940/2940W User's Guide.
Performing a Windows NT Installation
Follow these instructions if you are installing an Adaptec AHA-
2940/2940W host adapter and Windows NT at the same time. You may install
Windows NT from a floppy drive or from a CD-ROM drive; whichever you
choose, make sure the hardware installation is completed prior to following
these steps.
If you know that Adaptec drivers are supplied with your Windows NT
version, follow these procedures exactly to install the new driver. The
install program tries to access the old driver on other Windows NT
floppy disks or from the CD during installation.
1 If you choose to install Windows NT from a floppy drive, locate
the Windows NT Disk 1 for Floppy Installation. Make a backup
copy of this diskette.
If you are installing from a CD-ROM drive, locate the Windows NT Setup
Disk for CD-ROM Installation. Make a backup copy of this diskette.
2 Delete the file aic78xx.sys on the backup diskette you just
created. This file may not be on the disk; if it is not, skip this
step.
3 Put the backup diskette into drive A (not drive B) and turn
on your computer.
4 When prompted, select Custom setup.
Caution: If you choose Express setup, the installation process is unable
to detect your Adaptec host adapter and the installation fails.
5 Windows NT setup cannot recognize the adapter and displays
none. Press S to configure additional SCSI adapters.
6 From the list of additional SCSI adapters, select Other
(Requires disk provided by a hardware manufacturer).
7 Insert the Adaptec 7800 Family Manager Set Diskette for
NetWare, OS/2, and Windows NT into drive A and press Enter.
8 The screen displays the adapter similar to Adaptec Driver
for AIC78xx SCSI Controller. Press Enter.
9 If you want to add other host adapters (that are not a part
of the 7800 Family), do so at this time by following steps 6 through
8 for each additional adapter. The 7800 Family of host adapters
uses the same driver, so this step is not necessary for them.
10 Press Enter to continue with the Windows NT operating system
setup. Follow the instructions given onscreen and in the Windows NT
Installation documentation.
Updating Windows NT with the New Driver
This section explains how to make the following hardware changes to your
computer without reinstalling Windows NT:
Add an Adaptec host adapter that uses the same driver as one
already installed in your computer, and add an Adaptec host adapter
that uses a different driver
Swap an Adaptec host adapter for one that uses a different driver
Remove an Adaptec host adapter
NOTE: These operations are similar but have important distinctions, as
described in the following sections. Read the instructions carefully
before you change your computer configuration.
Adding a Host Adapter
This section details installing a host adapter in a computer. If you are
adding an Adaptec host adapter to a computer that already has an
installed host adapter of the same family (for example, if you have
added an AHA-2940 to a computer that already has an installed AHA-2940),
perform steps 1 through 5 only.
If you are adding a host adapter that uses a different driver, you must
perform all the steps in this section to ensure that the device driver
for the new host adapter is both installed on your system disk and is
enabled.
The steps are as follows:
1 Shut down Windows NT if your computer is ON.
2 Power OFF your computer and physically install the new host
adapter in an available slot. Refer to the host adapter hardware
documentation for installation.
 Always refer to your computer's documentation for instructions
on opening the computer cover and adding boards.
3 Verify that there are no system resource conflicts (e.g.
interrupt request level or DMA channel) between the new host adapter
and other hardware installed in the computer. Refer to the host
adapter hardware documentation for instructions; changes may be
necessary to the CMOS Setup.
NOTE: Depending on the BIOS for the PCI system, this step may not be
necessary.
4 Restart the computer.
5 Boot Windows NT. If you have just added an Adaptec host
adapter to a computer that already has an installed host adapter of
the same family (for example, if you have added an AHA-2940 to a
computer that already has an installed AHA-2940), your installation
is complete, do not perform steps 6 through 15.
6 Select and start the Windows NT Setup program. (Its icon is
usually found in the Main program group.) There is a brief pause while
Windows NT Setup scans your hardware -configuration.
7 Select the Options pull-down menu and then select Add/Remove
SCSI Adapters. The SCSI Adapter setup program displays a list of the
types of host adapters currently installed.
8 Click on the Add button to add another host adapter type to
the list. Expand the list and select the type of host adapter to be
added. For this example, we assume you are adding an AHA-2940 to a
computer that already has an AHA-1540C.
9 Click on the Install button.
At this point, Windows NT Setup checks to see if the specified driver
(in this example, aic78xx.sys) has already been copied to the system
disk. If this type of host adapter was previously installed, the
following message appears:
The driver(s) for this SCSI adapter are already on the system
10 Click on Current if you want to use the existing device
driver or click on New if you want to replace it. If you select
Current, skip to step 12.
If the device driver has never been installed, this message appears:
Please enter the full path to the Windows NT SCSI Adapter files.
11 Change the path to the directory with the desired device
driver, then click on Continue.
The device driver is copied to your system disk and the
Windows NT configuration is updated so that the new device driver loads
when Windows NT Reboots.
12 When the installation is complete, Windows NT Setup again
displays a list of currently installed host adapter types. Verify
that the new host adapter appears on the list; the string should
look similar to:
Adaptec Driver for AIC78xx SCSI Controller
13 Add other types of host adapters if necessary (see steps 8
through 12 above), or click on Close to exit the SCSI adapters
portion of Windows NT Setup, and then close the program.
14 When you see this message, click on OK to exit:
The changes you have made will not take effect until the computer is
restarted
If this message does not appear, no changes have been made to the
Windows NT system configuration.
15 Restart your computer and Windows NT. It is possible that
some drive letter assignments may change from the previous
configuration.
Swapping a Host Adapter
Swapping one type of host adapter for another is similar to the
procedure for adding a host adapter. The important distinction is that
you make all software configuration changes while Windows NT is running
and before you make the hardware changes.
1 Install the driver for the new host adapter by following
steps 6 through 15 in the section Adding a Host Adapter on page 3-5.
It is not essential to remove the device driver for the host adapter you
are replacing. Windows NT dynamically detects the absence or presence of
host adapter hardware, and no problems should arise if you leave the
existing device driver installed. You may remove the device driver
later, after you have successfully Rebooted Windows NT. However, if you
leave the driver in, the system alerts you with an error message of the
extra device driver every time you boot.
2 Once the new device driver is installed, shut down Windows
NT and replace the existing host adapter, as described in steps 1
through 5 of Adding a Host Adapter on page 3-5.
3 Restart your computer and Windows NT. It is possible that
some drive letter assignments may change from the previous
configuration.
Caution: If the host adapter you are swapping controls the computer boot
device, you must follow the additional steps in the next section in
order for Windows NT to work correctly.
Swapping the Boot Host Adapter
If the host adapter you are swapping controls the system disk from which
your Windows NT loads, you must update the device driver in two locations
(because Windows NT boots in a two-stage process): the Windows NT device
driver directory (i.e. \winnt\system32\drivers) and c:\ntbootdd.sys.
In the first stage of booting, no software configuration is available
and Windows NT loads the device driver to control the computer boot disk
from the file c:\ntbootdd.sys. Therefore, when you perform the steps
described above to swap a host adapter you must also explicitly copy the
aic78xx.sys device driver to c:\ntbootdd.sys (meaning that aic78xx.sys
is copied over and renamed as c:\ntbootdd.sys).
NOTE: The c:\ntbootdd.sys file is system, hidden, and read only; you
must use an attribute change program to disable the hidden and read only
attributes. For example, using DOS, enter attrib -h -r -s c:\ntbootdd.sys
to disable the these attributes before c:\ntbootdd.sys can be modified.
ntbootdd.sys is always located on your C drive, even if the system disk
once Windows NT boots is a different disk. For example MS-DOS is
installed on your IDE disk C, and Windows NT is installed on SCSI disk D.
Removing a Host Adapter
Removing a host adapter can be as simple as physically removing it from
the slot when your computer is shut down. Windows NT boots and functions
properly in this configuration, but a warning message is generated every
time you boot Windows NT.
Caution: If you have removed a host adapter but still have other host
adapters of the same type installed in your computer, do not use Windows
NT Setup to remove the device driver.
To eliminate the warning message, you must update the Windows NT
software configuration, as described in these steps:
1 Select and start the Windows NT Setup program. (Its icon is
usually found in the Main program group.) There is a brief pause
while Windows NT Setup scans your hardware -configuration.
2 Select the Options pull-down menu and select Add/Remove SCSI
Adapters. The SCSI Adapter setup program displays a list of the
types of host adapters currently installed.
3 Select the type of host adapter you want to remove and click
on the Remove button. When the Windows NT Setup program asks you for
confirmation, click on OK.
Because SCSI device drivers are loaded during system bootup and because
they may be needed to load Windows NT itself, the following warning
message appears:
The SCSI adapter has been marked as a boot device. Removing it may cause
the system not to boot.
4 If you are sure you are removing the correct host adapter
type, click on OK.
5 Return to step 3 if you want to remove driver support for
other types of host adapters, or click on Close to exit the SCSI
adapters portion of Windows NT Setup.
6 Close the Windows NT Setup program. When the following
message appears click on OK to exit:
The changes you have made will not take effect until the computer is
restarted.
If this message does not appear, no changes have been made to the
Windows NT system configuration.
7 Restart your computer. Note that Windows NT Setup does not
delete the device driver from your system disk; it only updates
Windows NT software configuration information so that the device
driver is no longer loaded during system bootup.
Updating a Device Driver
If a software update is available for a particular host adapter device
driver, you may update your Windows NT system without any hardware or
software configuration changes by following these steps:
1 Copy the new device driver to the directory -
Xxxxx\System32\Drivers, where Xxxxx is the system root of Windows NT
(typically named \winnt).
2 If you are updating the device driver that controls the
computer boot device, copy the same driver to the file
c:\ntbootdd.sys.
NOTE: The c:\ntbootdd.sys file is system, hidden, and read only; you
must use an attribute change program to disable the hidden and read only
attributes. For example, using DOS, enter attrib -h -r -s
c:\ntbootdd.sys to disable the these attributes before c:\ntbootdd.sys
can be modified.
3 Shut down and restart your computer.
Troubleshooting
The boot manager for Windows NT contains recovery logic to allow you to
return to the last known good configuration. If you have changed your
host adapter configuration and Windows NT no longer boots, follow these
steps to recover:
1 Undo any hardware changes you have made to the computer
since it was last operational.
2 Reboot the computer. Watch the display carefully during
bootup. If the following message appears, press the Spacebar and
follow the instructions on the screen to continue booting with
the last known good configuration:
Press spacebar NOW to invoke the Last Known Good menu
3 Once your computer is operational again, double check all of
the hardware and software configuration changes you want to make.
Look specifically for conflicts with parts of the existing system
configuration that are not being changed.
If you cannot determine the source of the error, contact Adaptec.
Adaptec 7800 Family Managers for NetWare 3.1X and 4.0X - V1.02
This capture contains Adaptec's Novell solution for the AIC-7800 Family of
Host Adapters. This includes AHA-2940s (PCI to SCSI), all AHA-2740Ws (PCI
to SCSI with wide channel), AIC-7870 (Chip on the motherboard supporting wide
channel), AIC-7850 (Chip on the motherboard supporting 8 bit SCSI channel).
The files included on the diskette which are required for the installation
of the NetWare drivers are as follows:
\netware\v3_1x\aic7870.dsk
\netware\v3_1x\aspitran.dsk
\netware\v4_0x\aic7870.dsk
\netware\v4_0x\aic7870.ddi
\netware\v4_0x\aspitran.dsk
If required, please consult your DOS manual on how to move around the
directory tree.
Within a subdirectory, you will find a README.TXT file describing the
driver(s) contained in that subdirectory.
The disk provides the following NetWare drivers:
1.) AIC-7870 Family of Host Adapters Driver For NetWare 386 v3.11 and v3.12.
(\netware\v3_1x)
2.) AIC-7870 Family of Host Adapters Driver For NetWare 386 v4.00 and v4.01.
(\netware\v4_0x)
3.) ASPITRAN.DSK ASPI Transport Layer Manager Driver for NetWare v3.1x.
(\netware\v3_1x)
4.) ASPITRAN.DSK ASPI Transport Layer Manager Driver for NetWare v4.0x.
(\netware\v4_0x)
5.) AIC7870.DDI Driver definition information file for NetWare v4.0x only.
(\netware\v4_0x)
Coosing SCSI Cables for AHA-2940 Ultra / AHA-2940 UltraWide
| SCSI Device Type | AHA-2940 Ultra | AHA-2940 UltraWide |
|---|---|---|
| 8-bit Internal SCSI | 50-pin internal SCSI cable |
50-pin internal SCSI cable |
| 8-bit External SCSI | 50-pin high density external SCSI cable |
- |
| 16-bit Internal Wide SCSI |
- | 68-pin internal SCSI cable |
| 16-bit External Wide SCSI |
- | 68-pin external SCSI cable |
Terminating the AHA-2940 Ultra Wide Adapter
Termination of the AHA-2940UW itself is controlled by software commands via the SCSISelect utility.
The default setting is set to Automatic.
It is recommended to leave the AHA-2940UW set to its default setting of AUTOMATIC.
The following table lists the termination settings for manual configuration.
| Devices Connected to AHA-2940UW | AHA-2940 Ultra Wide Termination Low ---- High |
|---|---|
| 68-pin internal connector only | ON ----- ON |
| 68-pin external connector only | ON ----- ON |
| 68-pin internal and 68-pin external connectors | Off ---- Off |
| 50-pin internal connector only | ON ----- ON |
| 50-pin and 68-pin internal connectors | OFF ---- ON |
| 50-pin and 68-pin external connectors | OFF ---- ON |
Please see the LEGAL - Trademark notice.
Feel free - send a  for any BUG on this page found - Thank you.