|
|
 If you change the write policy to write-back,
wait at least 10 seconds after the last operation
before you power-off the server.
It takes that long for the system to
move the data from the cache memory to the storage device. Failure
to follow this practice can result in lost data.
If you change the write policy to write-back,
wait at least 10 seconds after the last operation
before you power-off the server.
It takes that long for the system to
move the data from the cache memory to the storage device. Failure
to follow this practice can result in lost data.
Note:
The information might be different from that shown in this screen.
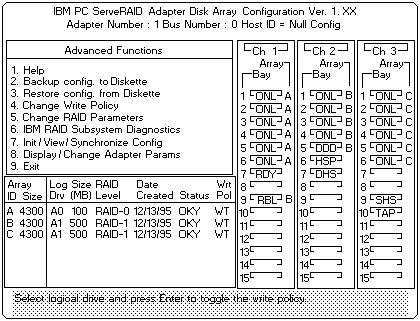
The Logical Drive list contains the logical drive ID, the size in megabytes of each logical drive, the RAID level you assigned to that logical drive, and the date you created it.
The status of the logical drive is also shown. OKY means that no problem conditions are associated with the drive, CRT means that you must replace the hard disk drive and rebuild the logical drive. (You will have received a message telling you what has happened to the drive.) OFL means that the logical drive is irrecoverable, the data in that drive is lost.
The write policy is shown as either WT (write-through, which is the default setting) or WB (write-back).
 ) key or the Down Arrow (
  ) key to
select the logical drive whose write policy you want to change.
) key to
select the logical drive whose write policy you want to change.
If you change the write policy to write-back,
wait at least 10 seconds after the last operation
before you power-off the server.
It takes that long for the system to
move the data from the cache memory to the storage device. Failure
to follow this practice can result in lost data.
Notice that WT changes to WB. You can press Enter to alternate between WT and WB.
Please see the LEGAL - Trademark notice.
Feel free - send a  for any BUG on this page found - Thank you.