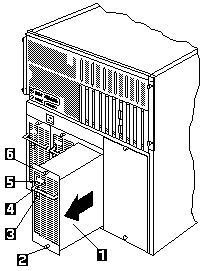
- Locate the power supply -1- that you want to remove.
 Do not remove a power supply without first
turning the Power switch on the power supply to the Off position.
Do not remove a power supply without first
turning the Power switch on the power supply to the Off position.
- Set the Power switch -3- on the power supply you
are removing to the Off position.
- When you remove a power supply, first,
loosen comptetety the bottom screw that attaches the power supply to the server,
then, loosen the top screw. Failure to do so
can damage the power supply.
- For proper system cooling, do not operate
the server for more than two minutes without
a power supply or a filler paneL installed for
each of the power-supply bays.
- Loosen completely the bottom screw -2- on the the
back of the power supply, then, loosen the top screw -6-
 Caution Never remove the cover on a power supply.
Hazardous voltage, current, and energy levels
are present inside the power supplies. There are
no serviceable parts inside the power suppLies.
- Grasp the handle on the power supply, then, slide the
power supply out of the chassis.
- If you are not installing a replacement power supply,
install a power-supply filler panel.
If you are replacing the power supply:
Before you install a supply. set the
Power switch on the power supply to the Off position.
- Set the Power switch on the power supply to the Off position.
- Support the power supply by the handle on the back.
- Slide the power supply into the chassis.
When you install a power supply. first,
tighten completely the top screw that attaches the power supply to the server,
then, tighten the bottom screw. Failure to do so can damage the power supply.
- Tighten completely the top screw -6- on the
power supply, then, tighten the bottom screw -2-
- Set the Power switch -3- on the power supply to the On position.
- Verify that the AC Power light -5- and DC Power
light -4- are lit, indicating that the power supply is operating correctly.
 for any BUG on this page found - Thank you.