 |

 IBM-AUSTRIA - PC-HW-Support 30 Aug 1999
 |
Hot-Swap Drive Replacement (Netfinity 7000 - 8651)
Hot-Swap Drive Replacement
NOTE: You do not have to powe oft the server to remove a
drive from the hot swap bays.
If the amber Hard Disk Status light for a drive is lit
continuously, that individual drive is faulty and needs to be replaced.
 Before you hot-swap a drive, make sure it is defective.
If you partially or completely remove a good drive
instead of a defective one, the server might lose
valuable data.
This situation is especially relevant if the server has a
RAID adapter installed and you assigned RAID level 1
or 5 to the logical drives in the disk array. However,
the RAID adapter can rebuild the data that you need,
provided that certain conditions are met. Refer to the
RAID adapter documentation for further details.
To replace a drive in a hot-swap bay, do the following:
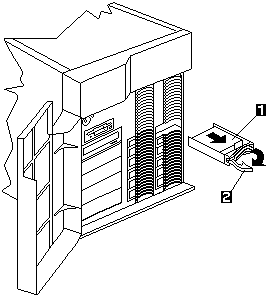
- Unlock and open the server door.
 To maintain proper system cooling, do not
operate the server for more than two minutes
without either a drive or a filler panel installed for each bay.
- Remove the defective hard disk drive -1- by placing
the handle -2- on the drive to the open position
(perpendicular to the drive) and pulling the hot-swap
tray from the bay.

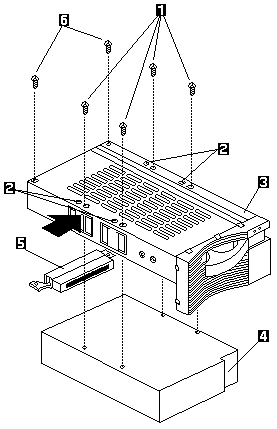
- Remove the hard disk drive from the tray:
- If the drive is a half-high drive, remove the two
screws -6- that hold the connector -5- to the
hot-swap tray -3- then, remove the connector
from the back of the drive.
- Remove the four screws -1- or -2- that attach
the drive -4- to the hot-swap tray, and remove
the drive from the tray
- Place the new hard disk drive on the hot-swap tray
and attach the drive to the fray using four screws, as
follows:
- If the drive is a half-high drive, use screws -1- to
attach the drive to the tray. If the drive is a
slim-high drive, use screws in holes -2- to attach
the drive to the tray
- As you tighten each screw, press on the metal
spring nearest the screw at the point indicated
by the arrow on the illustration.
- If the drive is a half-high drive, plug the
connector -5- to the back of the drive and
secure the connector to the drive with screws -6-

1. Screws or half-high drive
2. Screw holes for slim-high drive
3. Drive tray
4. Drive
5. Connector for half-high drive
6. Screws for haff-high drive connector
- Install the hard disk drive in the hot-swap bay:
- Ensure the tray handle is open (that is,
perpendicular to the drive).
- Align the drive/tray assembly so that it engages
the guide rails in the bay.
- Push the drive assembly info the bay until the
drive connects to the backplane.
- Push the tray handle to the right until it locks.
- Check the hard disk drive status indicators to verify
that the hard disk drives are operating properly. See
'Status Indicators' for details.
- Close and lock the server door.
Back to 
More INFORMATION / HELP is available at the IBM-HelpCenter
Please see the LEGAL - Trademark notice.
Feel free - send a  for any BUG on this page found - Thank you.
 Before you hot-swap a drive, make sure it is defective.
If you partially or completely remove a good drive
instead of a defective one, the server might lose
valuable data.
 To maintain proper system cooling, do not
operate the server for more than two minutes
without either a drive or a filler panel installed for each bay.


 for any BUG on this page found - Thank you.