 |

 IBM-AUSTRIA - PC-HW-Support 30 Aug 1999
 |
Running the Diagnostics
 How to Run the Diagnostics
The following tools are required to run the diagnostics:
- FDD: Erasable 2HD diskette.
- CD-ROM: Any CD (data CD is recommended)
- DVD: Any CD (don't use DVD disk, but use data CD)
- Parallel: Tri-connector wrap plug (P/N 72X8546)
- Serial: Tri-connector wrap plug (P/N 72X8546)
- PCMCIA: Test Card (P/N 35G4703)
- USB: USB-Parallel Wrap Cable (P/N 05K2580)
See > Displaying the Error Log
Use either the TrackPoint or the cursor-moving keys to interact
with the tests.
The Enter key works the same as selecting the OK icon to
reply OK.
- Press and hold the F1 key, then power on the computer.
Hold the F1 key down until the Easy-Setup screen menu appears.
- Click on Test. The basic diagnostic menu appears.
- Click on a device to run the test. The test progress screen appears, then
OK appears under the tested device icon when the test ends without any errors.
- Start the Advanced Diagnostic test by pressing
Ctrl+A on the basic diagnostic menu screen.
The ThinkPad FRU Connection windows appears.
- Click on Exit or press Esc key.
The keyboard test windows appears.
- When you press a key, a mark appears or dissapears on the corresponding key position
on the screen.
Repeat this step for any keys that need to be tested.
You can run the keyboard test if you press Ctrl+K in the
advanced diagnostic test mode.
- To exit the keyboard test, click on Exit or press Ctrl+Break
The advanced diagnostics window appears.
- Click on a device to test it, or click on Test All to test all devices.
Click on Looptest to run the tests in a repeated loop.
The loop option menu appears. Click on a device, the OK mark appears beside the selected device.
Repeat this step to select multiple devices. Click on OK to start the diagnostic loop.
If no device is selected, all devices tests are looped.
- To exit the loop,
keep pressing Ctrl+Pause until the test exits.
A beep sounds to notify that the exit interrupt is sensed
by the test program. Press Esc to exit from the loop test.
PC Card Slots Test
The green LED on the PC test card turns on when the PC Card slot test is running.
If the LED does not turn on, check that the card is installed correctly by reseating it.
If the LED still does not turn on after the card is reseated, try using another slot for the test.
If the LED still does not turn on and the test fails, replace the FRU shown by the diagnostic error code.
Universal Serial Bus (USB) Test
At the advanced diagnostic window, do the following:
- Connect the USB parallel test cable to the parallel connector of the computer.
- Connect Connector 1 of the cable to the USB connector of the computer.
Note: The illustration shows a ThinkPad 770 computer, but the
procedure is the same for the other model.
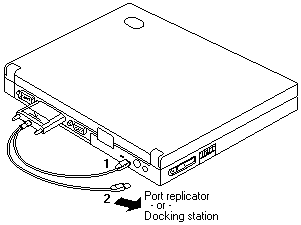
- Click on USB-1 to run the test.
Follow the instructions on the screen. OK appears if the
test passed, but three lines of error codes appear if the test failed.
The defective FRU must be the system board.
If you want to test the USB port on the port replicator, connect the USB parallel test cable to a port
replicator and click on USB-2.
If you want to test the USB port on a docking station, connect the USB parallel test cable to to the
USB ports of the docking station and click on USB-3 and USB-4.
See > Displaying the Error Log
Back to 
More INFORMATION / HELP is available at the IBM-HelpCenter
Please see the LEGAL - Trademark notice.
Feel free - send a  for any BUG on this page found - Thank you.