| Depot Repair Form | |
| Direction Desktops | |
| Downloads | |
|
Express5800 Servers |
|
|
Frequently Asked Questions |
|
| Handheld PCs | |
| Monitors | |
| Notebooks | |
|
PowerMate & Ready ES Pro Desktops |
|
| Search | |
|
Service Provider Locator |
|
| UltraCare Services | |
| Versa Utilities | |
| Windows Update | |
| Y2K Information | |
BCM 540/541 Motherboard RAM Upgrade
| Caution | ESD precautions and proper handling procedures must be observed in order to prevent damage to system components. |
The BCM 540/541series motherboards have four SIMM sockets
configured as two (0-1) banks. The upgrade memory is upgradeable
to 128MB. The 72-pin SIMM sockets will accept 1MBx32 (4MB), 2MBx32
(8MB), 4MBx32 (1632MB), and 8MBx32 (32MB) extended data out DRAM
SIMMs with the recommended access speed of 60ns or faster. This
motherboard will accept either single or double sided SIMMs.
Memory type, size, and speed can vary between banks, but cannot
vary within each 2-socket bank. This series of motherboards will
support 36 bit SIMM modules (parity).
The possible memory upgrade configurations are listed.
They can be installed in any order :
|
SIMM Type (Amount) |
SIMM Type (Amount) |
Total System Memory |
|---|---|---|
| 1M x 32 (4 MB) | Empty | 8 MB |
| 1M x 32 (4 MB) | 1M x 32 (4 MB) | 16 MB |
| 1M x 32 (4 MB) | 2M x 32 (8 MB) | 24 MB |
| 1M x 32 (4 MB) | 4M x 32 (16 MB) | 40 MB |
| 1M x 32 (4 MB) | 8M x 32 (32 MB) | 72 MB |
| 2M x 32 (8 MB) | Empty | 16 MB |
| 2M x 32 (8 MB) | 1M x 32 (4 MB) | 24 MB |
| 2M x 32 (8 MB) | 2M x 32 (8 MB) | 32 MB |
| 2M x 32 (8 MB) | 4M x 32 (16 MB) | 48 MB |
| 2M x 32 (8 MB) | 8M x 32 (32 MB) | 80 MB |
| 4M x 32 (16 MB) | Empty | 32 MB |
| 4M x 32 (16 MB) | 1M x 32 (4 MB) | 40 MB |
| 4M x 32 (16 MB) | 2M x 32 (8 MB) | 48 MB |
| 4M x 32 (16 MB) | 4M x 32 (16 MB) | 64 MB |
| 4M x 32 (16 MB) | 8M x 32 (32 MB) | 96 MB |
| 8M x 32 (32 MB) | Empty | 64 MB |
| 8M x 32 (32 MB) | 1M x 32 (4 MB) | 72 MB |
| 8M x 32 (32 MB) | 2M x 32 (8 MB) | 80 MB |
| 8M x 32 (32 MB) | 4M x 32 (16 MB) | 96 MB |
| 8M x 32 (32 MB) | 8M x 32 (32 MB) | 128 MB |
Installing SIMMs
The following is a procedure for installing SIMM modules into
a SIMM socket.
Step 1:
Line up the SIMM module as illustrated in Figure 2, pin 1 is
indicated by a small triangle on the motherboard. Insert the
module into the socket at roughly a 45 degree angle. The SIMM
module is keyed and can only be inserted one way.
Step 2:
Pivot the SIMM module up until it is at a 90 degree angle in
relation to the motherboard. The locking tabs should snap into
place when the SIMM is in the proper position as illustrated
in Figure 2.
| Figure 2 | ||
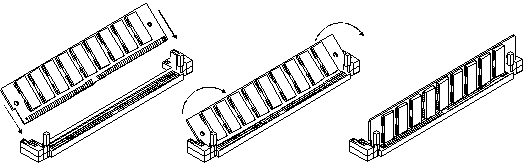
|
||
| STEP 1 | STEP 2 | STEP 3 |
Once the SIMM modules are installed, the system will display the correct amount of memory, since the system automatically detects the amount installed; there are no jumper settings for memory configuration. The memory should be enabled and fully functional.
Document Information
KBID# 058620, Last Reviewed: November 11, 1999
Document Path: